

Summer time! It is finally warm enough to get outside to enjoy the sunshine. One thing my toddlers absolutely love this time of year is water play. Sprinklers, swimming, splash pads… you name it. I was looking into purchasing a water table when I made a startling realization: they can get pretty pricey! Rather than accept defeat, I decided to make one myself. Check out my adventures in making: The DIY Water Table made from PVC Pipe.
As usual, I found the idea for this project on Pinterest. (Click here to see my inspiration!) All of the materials can be purchased at Home Depot or Lowe’s. This is a fairly simple project to assemble, and was finished in under an hour. I paid around $60 including the materials, pipe cutter, and the bin. I still have a lot of materials left over that I plan to use for additional projects.


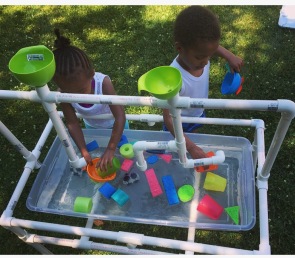
Once the table was assembled, I filled the bin with water. I cut basic shapes from sponges and sliced up some pool noodles for the kids to play with. I also threw in a couple of bowls, cups, a boat, and toy cars. I think it is pretty safe to say that this was a huge hit!


Planning to try this project? Here are my suggestions based on my experience:
1. Choose cutting tools wisely!
There is a huge variety of PVC cutting tools out there, ranging in cost from $7 to insanity. Unless you enlist the help of someone with super human hand strength, you’ll want to make sure you choose a tool that is easy enough for you to manipulate, yet strong enough that you won’t be sawing away at the material for hours on end. I chose this tool: Lenox Plastic Tubing Cutters.

It’s not too heavy and I was able to operate it myself. It took about two squeezes to cut all the way through the pipe. Cost was about $20 – worth it to me, because I plan to use it again for other projects.
*Also: Make sure your tool is compatible with the size tubing you’re using. For example, if you are using 3/4″ tubing, make sure you have the appropriate size cutting tool. It’s pretty frustrating when you get all the way home and figure out that the tool you just bought is too big for the pipes you bought! (Not that I’d know from experience or anything…)
2. Don’t freak out about measurements.
The exact measurements of your table are determined by the size and shape of the bin you want to use. Sites like the one I mentioned earlier will share the measurements of the bin they used. It’s a great starting point, but don’t worry if yours doesn’t measure exactly the same. Just make sure it fits your bin.
3. Invest in PVC glue.
While the table will be sturdy enough on its own, you run the risk of it stating to come undone as you move it or if the children lean or climb on it. Here is what a friendly Home Depot team member suggested to me: Oatey Regular Clear PVC Cement.

4. If you decide to glue your table parts together, I highly suggest that you only glue the main section of the table the holds the bin. Leaving the legs and top part with funnels unglued allows for easier storage and portability – you can pull those pieces off and store them in the bin with the funnels and toys.


5. Don’t pack it away when summer time comes to a close.
This table can very easily become a sensory table (or “Science Table”, as my kids have nicknamed it) by filling it with beans, pasta, or water beads. The DIY Water Table made from PVC Pipe can bring year-round fun!
I hope you enjoy this idea as much as we do. If you decide to try it, please come back and share your success story, comments, questions, or related ideas.
Looking for other fun ways to use PVC Pipe for water play? Check out some ideas I’m planning to try this summer: PVC Projects
Happy Splashing! 🙂


How does this project price compare to the water tables you were researching? Does the $60 include the cost of the time? To me that looks comparable to a water table but also has the added value of tools that can be used again and again for other projects. Another question – can you remove the bin once you build around it? Perhaps you could invest in several bins – one for water, one for sand, and one for less messy sensory materials. Many of these bins come with a lid for easy storing. But maybe that’s just me making this more complicated than it needs to be!!!
LikeLike
Hi Anna! Thanks for writing. You asked some great questions.
I found a wide range of prices when researching water tables. There were some basic ones that were about $25, but they were geared more toward younger toddlers and didn’t seem to store easily. I continued searching until I saw a few “sand and water tables.” Those ranged from about $106-300 plus shipping. What impressed me most about this DIY Table is the versatility. You can customize the tube that runs along the top with funnels and attachments as you see fit (those really expensive tables don’t even come with the top piece!). I also like that if you decide not to glue all of the parts together, they can be easily stored in the bin. I will post an update to show how I store mine. Finally, (and in response to your third question) you can remove the bin for easy cleaning. If you decide to buy additional bins for use with different sensory activities (sand, water beads, etc.) you can store those materials in their respective bins. You can really do as much or as little as you want this project and your kids will surely enjoy it!
Here are some examples of other tables I looked at, just for comparison:
1.) Wood Designs Sand & Water Table w/ Lid/Shelf
https://www.schooloutfitters.com/catalog/product_info/pfam_id/PFAM34038/products_id/PRO45292?sc_cid=Google_WDD-WD11810&adtype=pla&kw=&CAWELAID=320012570000017274&CAGPSPN=pla&CAAGID=13113392537&CATCI=pla-84737290577
2.) Petite Sand and Water Table
https://www.google.com/#tbm=shop&q=sand+and+water+table&spd=3540630010117317581
3.) Toddler Sand and Water Table
http://www.lakeshorelearning.com/product/productDet.jsp?productItemID=1689949371894955&utm_source=google&utm_medium=ppc&utm_campaign=PLA&CAWELAID=520011010000002247&CAGPSPN=pla&CAAGID=14792439177&CATCI=pla-146395861017&catargetid=520011010000052941&cadevice=c&gclid=Cj0KEQjwhtO7BRCtwuO9gfTH-fQBEiQAdJ8FY–te3y_vn7oWRZMsZValM8UvWNeFKqNwN8Jq6sGqWkaAvYf8P8HAQ
LikeLike
How fun! I’ve been thinking about getting a water table, but this looks extra cool! I’ll have to look into it and maybe improvise a little. Great job!
LikeLike
This turned out great! It looks way cooler than the water table my kids had!
LikeLike
This looks like a ton of fun. I’d love to try to make one too. Thanks so much for the inspiration.
LikeLike
What a great idea! I think I actually ran across this or even shared it on Facebook the other day. Or Pinterest? I’ve been looking for fun water activities to do in my backyard for a moms club event! Thanks for sharing at the Family Joy Linkup! Hope to see you again this Sunday!
LikeLike
Wow! This is an amazing table, I’m so impressed! To have something that’s comparable to the water play you see in a Children’s Museum for $60? Fantastic. I really want to give this a go… Already have a pipe cutter & some leftover connections/tubing from my husband’s plumbing project a little while back so yay! Thanks so much for sharing this!
LikeLike
This looks like a ton of fun, and my toddler loves playing with water 🙂 Great idea.
LikeLike
What a great idea! I love it, I wonder if I can talk my husband into making it for our boys 😉 Thanks for sharing!
LikeLike
What a fun idea!!! I can’t wait to try some projects like this once my munchkin is a little older. Pinning for later. 👍
LikeLike
I just noticed you do not have a Pinterest link but I will check out the link you have in your post. 😀
LikeLike
Thanks for stopping by! Here is the Pinterest pin. Hope you have a blast! 🙂 https://www.pinterest.com/pin/331929435019624921/
LikeLike
OMG my daughter would love this! I have to make it for her!
LikeLike
This looks so awesome! I need to save this for future reference
LikeLike
What a neat idea! You are really skilled to pull that off. Looks like a hit with your kids 😀
LikeLike
This is great! My little guy LOVES water play. I pinned something similar awhile back but it didn’t have the fancy stuff on top. I like that!
LikeLike
Looks like a ton of fun!
LikeLike